- By Marc Buttler
- May 31, 2020
- Automation Basics
Summary
By Marc Buttler 
When considering new technology, there are many data points to consider before making a substantial investment. One of the most important factors to consider when looking at upgrading flow measurement tools is the calibration and measurement traceability of that equipment.
The calibration of the meter is just as important to your confidence in the measurements as the design, skill, and quality of materials used in manufacturing it. The calibration-related capabilities, accreditation, and experience of the manufacturer will often influence whether you can accept the manufacturer’s factory calibration, or if you need to seek a third-party calibration service provider at additional cost to achieve the measurement uncertainty and traceability you need to meet your goals and expectations. The best advice is to choose a manufacturer that has invested the necessary resources in building and maintaining the competence needed to provide superior calibrations along with their products.
Not all Coriolis flowmeters are created equal, and not all can meet the most exacting measurement standards. There are many industry applications where “good enough” is not an acceptable measurement. These types of applications, such as pharmaceutical production or custody transfer, for example, require a more precise measurement to satisfy stringent local and federal regulations. Even global standards can apply when a facility manufactures in one place but sells into another in our connected world.
Having a well-calibrated device affects the ultimate product a company produces as well. By producing a product within tight tolerances and unique specifications, a business builds a reputation for quality, but that can only be maintained if that business has the tools to do so. Before we delve deeper into calibration, let’s first look at what makes a Coriolis flowmeter such a reliable and valuable tool to different industries.
Coriolis flowmeter basics
The first important element to note about a Coriolis flowmeter is the fact that it has no mechanical parts that can wear out, which increases the lifespan of a meter significantly. Another benefit of this, somewhat unique to Coriolis meters, is they do not need nearly as frequent recalibration as mechanical type meters. The measuring element has no cause to wear or change over time.
The operation of a Coriolis flowmeter is based on the principles of motion mechanics. As fluid moves through a vibrating tube, Coriolis force is generated as the fluid is forced to increase its angular momentum to move with the tube vibration as it approaches the point of peak-amplitude vibration. Conversely, angular momentum is lost when the fluid moves away from the point of peak amplitude as it approaches the exit point of the tube. The result is a twisting reaction of the flow tube during flowing conditions as it traverses each vibration cycle.
There are a few things to consider about calibration best practices before choosing a Coriolis flowmeter. Primarily those are the traceability of the reference standard that will be used for the meter calibration and the calibration procedures that apply to a specific meter model.
Measurement traceability
There are two essential elements to traceability:
- an unbroken chain of measurement comparisons, each to a higher standard, that eventually link back to national or internationally maintained reference standards
- a documented uncertainty calculation that includes the accumulated uncertainties of all the previous measurement comparison links in the chain.
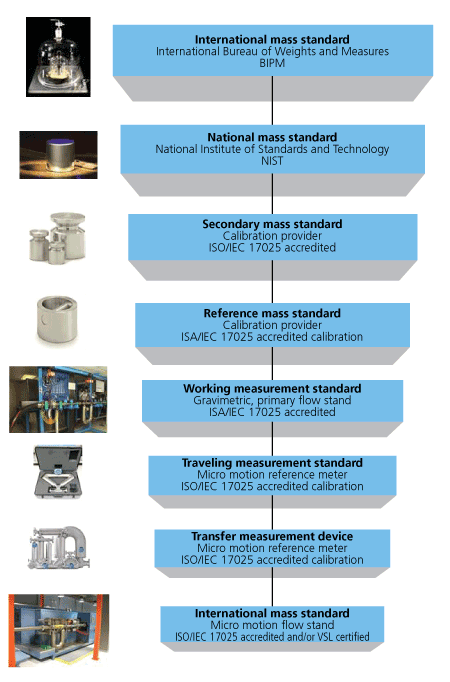
It is essential to a facility that its most important tools for flow process control (i.e., Coriolis flowmeters) meet local, state, and federal regulations, as well as their own internal quality standards. Having a rigorous measurement traceability to international standards helps ensure flow measurement equipment can meet those standards. In the case of mass flow measurement, such as those a Coriolis meter can provide, traceability is the chain of measurement standards going back all the way to the International Mass Standard as determined by the Planck constant. (Previously, the standard was set by the International Bureau of Weights and Measurements, but the world has recently adopted a natural standard defined by Planck’s constant for greater consistency and accuracy).
Traceability documents the paths by which everything ties back to a single central starting point. In addition, traceability allows a facility to understand and apply the appropriate level of uncertainty to its measurements. Finding the right balance between the cost of uncertainty and the benefits of product quality and process efficiency can be achieved by understanding the uncertainty as documented in a traceability fact sheet or website for the meter under consideration. In all instances, the level of precision and refinement of a product will depend on the level of uncertainty found in the meter. Figure 1 illustrates a chain of traceability, which is an essential tool in achieving traceability accreditation.
Calibration procedures
The traceability of a calibration reference standard obviously matters, but how is calibration against a set standard achieved? The calibration process requires a strictly controlled procedure and an environment where a device can be put through a series of reproducible tests.
When calibrating a Coriolis flowmeter, there are two different preferred methods that can be used to reach optimal calibration. There are other methods available for other types of flowmeters that are sometimes used in applications that do not require the meter to handle flow rate transitions as well as a Coriolis meter can.
Static start/finish method

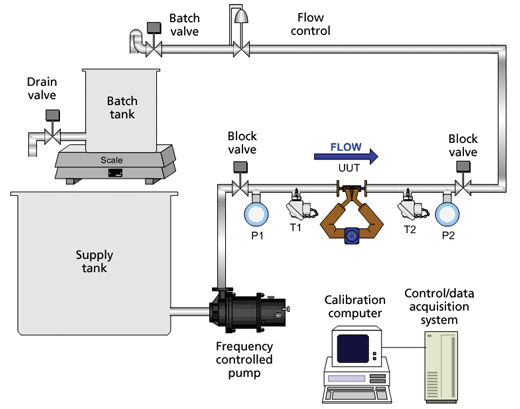
When the calibration batch begins and ends at a no-flow condition, it is a static start/finish method of gravimetric calibration. A weigh scale is used as a reference in this method, and the scale will have been calibrated using traceable mass standards. In this instance, the test fluid is water. The water is measured through the unit under test (UUT) and collected in the tank. At the end of the test, the tank is weighed again and compared to the total mass measured by the UUT.
In an application where it is necessary to obtain a better uncertainty, the mass shown on the scale will be corrected for the effect of buoyancy acting on the water in the tank, as well as for the effect of buoyancy on any immersed pipe in the setup. Fluid pressure and temperature are measured upstream and downstream of the UUT. For static start/finish, the ambient pressure, temperature, and humidity are measured during each test. Figure 2 represents graphically how this method works.
Transfer standard method

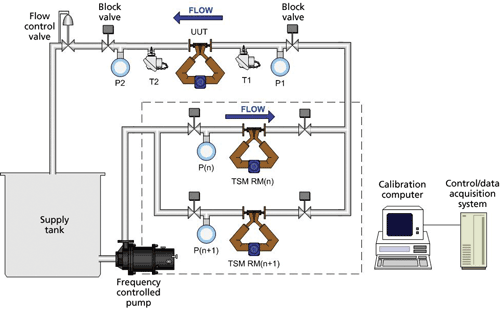
The transfer standard method (TSM) of calibration is a dynamic start-finish method where a batch starts and ends at a steady flow. Using water as the test fluid, the calibration is performed in closed conduits. Water passes through both the reference meter (RM) and the unit under test. In this example, two reference meters are used that are known as the master meters and are known good meters initially calibrated on an ISO/IEC 17025 accredited primary gravimetric flow stand following the static start/finish method. The traceability associated with this method is maintained annually using global reference meters for comparison testing.
With the TSM method the mass total from the UUT is compared to the mass total from the RM using pulse counters. Pulse counters are triggered on and off for both the UUT and RM at the same time. Upstream and downstream measurement of fluid temperature and pressure are done to ensure consistency and reproducibility. Figure 3 illustrates the TSM calibration process.
Fit for purpose uncertainty

When considering calibration methods and traceability standards, it is critical to understand the cost of reaching each incremental level of improvement to the uncertainty and how tight of an uncertainty might be justified given the impact on the process where the Coriolis flowmeter is used. Determining uncertainty levels of a meter is done by the combined uncertainty of each of the traceable steps leading to the calibration of the meter. Uncertainty increases in small increments, often negligible to the results of the process, with each step further down the traceability chain.
What happens when a Coriolis flowmeter leaves the laboratory and is no longer in the controlled environment where it was calibrated? Secondary effects then come into play and add more uncertainty to the performance of the meter in situ in a process.
Calibration uncertainty and the effects of process on the flowmeter combined will determine the final uncertainty of the measurement. This is why it is important to understand both the uncertainty of the calibration and the impact and magnitude of secondary effects of a process in order to know the appropriate level of calibration uncertainty that is needed—or is acceptable—to ensure a quality final product.
Reader Feedback
We want to hear from you! Please send us your comments and questions about this topic to InTechmagazine@isa.org.


